Keeping it on the rails
About Me
Hello, I am ghostchamb3r and this is my Masterclass. 👻
For lack of a better term I produce electronic dance music. I take influences from a variety of genres and as a result I use a variety of production techniques and sound design approaches. When I go to upload my music to Spotify I just tell Spotify that it's Hard Techno, because sure, why not? I'm pretty sure it's not actually hard Techno or any of the other genres from the pulldown list. I don't know what it is. What I do know is that it's danceable and it hits hard on a club room floor.
I produce in Ableton Live and I perform in Tidal Cycles.
I spent a considerable amount of time deciding on how I was going to go about performing my music. At the end of the day turntables were not for me. I love Tidal Cycles and what it lets you do with samples. I love how portable it makes performing electronic music. All of my sets are just a laptop, an audio interface, and two 1/4 inch jack outputs to the house system. It doesn't get any more complicated than that and it makes the sound techs lives easier. Getting a projector set up to share my screen is probably the only troublesome thing I encounter but a lot of times the house has a projector and it's not a huge issue. I looked into other live coding environments as well and tried Sonic Pi for a short while. Ultimately I just like Tidal better than the others and that's purely my preference.
I work with prepared code for my live sets and I do so for a number of reasons. Ultimately I'm not someone who uses live code to realize my ideas, or rather I don't use live code out of the gate as a compositional tool.
I'm comfortable with a certain set of tools (probably too comfortable) and how they support my creative process. My process starts in Ableton. I consider the slick, polished studio version of a piece and it's live code counterpart as two different entities. One exists as a fine-tuned, finessed experience intended for listening as a fixed-media representation of a musical idea. The other is a live interpretation of that with room for improvisation and deviation, so that each live performance is a unique experience. Maybe that approach riles some feathers, I can't say for sure, but it's fun for me and doesn't hurt anyone and that's all I care about.
Preparation of Code
I like to think of preparation of code more as a consideration for the audience than as something intended to help me perform. There's a lot of cool things that can happen if you just improvise freely but even if people can see my screen, ultimately what I'm experiencing is far different than the audience in an improvisational setting because ultimately I'm making decisions and the audience is not. They might experience anticipation and their response might influence my performance but in the end they don't have any sort of direct control over the music and so it's important to me to consider their experience when I perform.
For me, that means having the skeleton of a piece prepared in advance so that I have room to improvise and react to the audience's response while still being able to move from one section of a piece to another and maintain a sense of movement or progression through musical ideas to keep the audience engaged. A piece doesn't constantly need to be grabbing the listener's attention, in my opinion, but I want to maintain a flow between getting lost in the music and having it bring the listener into the present moment.
Skeleton
Here's a track I made, titled Birth Machine, in Ableton.
I personally love the work of HR Giger and have since I was very young. The piece was a reflection on the Giger painting of the same name. I don't agree with some of Giger's ideas in regards to that particular piece of art, but I think it's still a really solid piece of artwork.
Birth Machine - 2 Versions
| Polished studio version | wildly unhinged live coded version |
|---|---|
| Birth Machine: tr 2 of NECRONOM | Birth Machine: Live at Ice House MPLS |
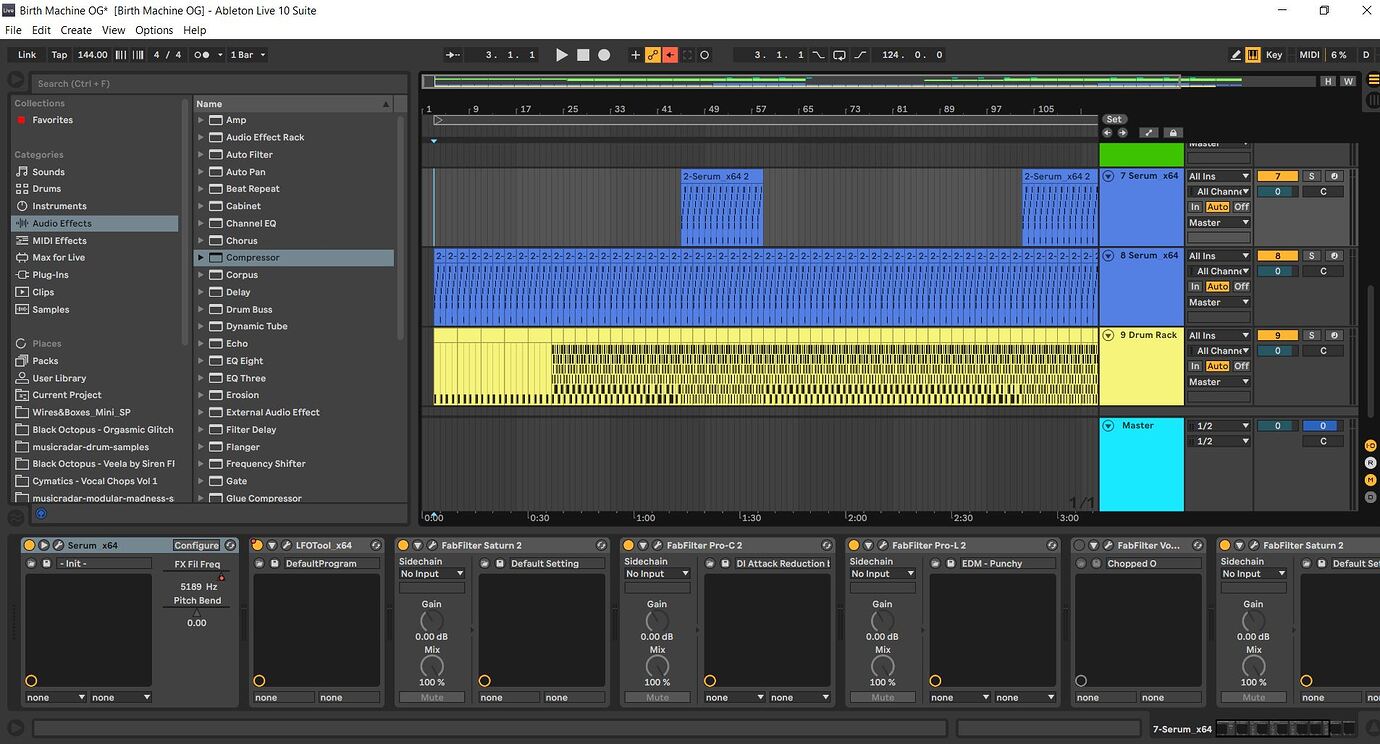
Here's the signal chain for the main synth track:

- I have Serum piped out to LFO Tool to smooth out some of the rumbliness of the overall signal
- Compression a'la FabFilter-C with aggressive limiting a'la FabFilter-L
- Sidechain compression to attenuate the signal when one of the other synths come in
- An FFT spectrum analyzer set to a K-14 meter to monitor the signal loudness see the frequency spectrum
- Automation on the cutoff frequency of the low pass filter inside serum's FX chain.
Over the course of a few bars the cutoff opens up more and more and lets the signal through, giving it a nice smooth fade in as the track plays through it's opening lines. I've also automated some pitch bending on the mod wheel to give it a sense of organic movement in the signal that gives it a nice sense of liveness, for lack of a better term.
Serum patch - Bhad Bhabie for Birth Machine
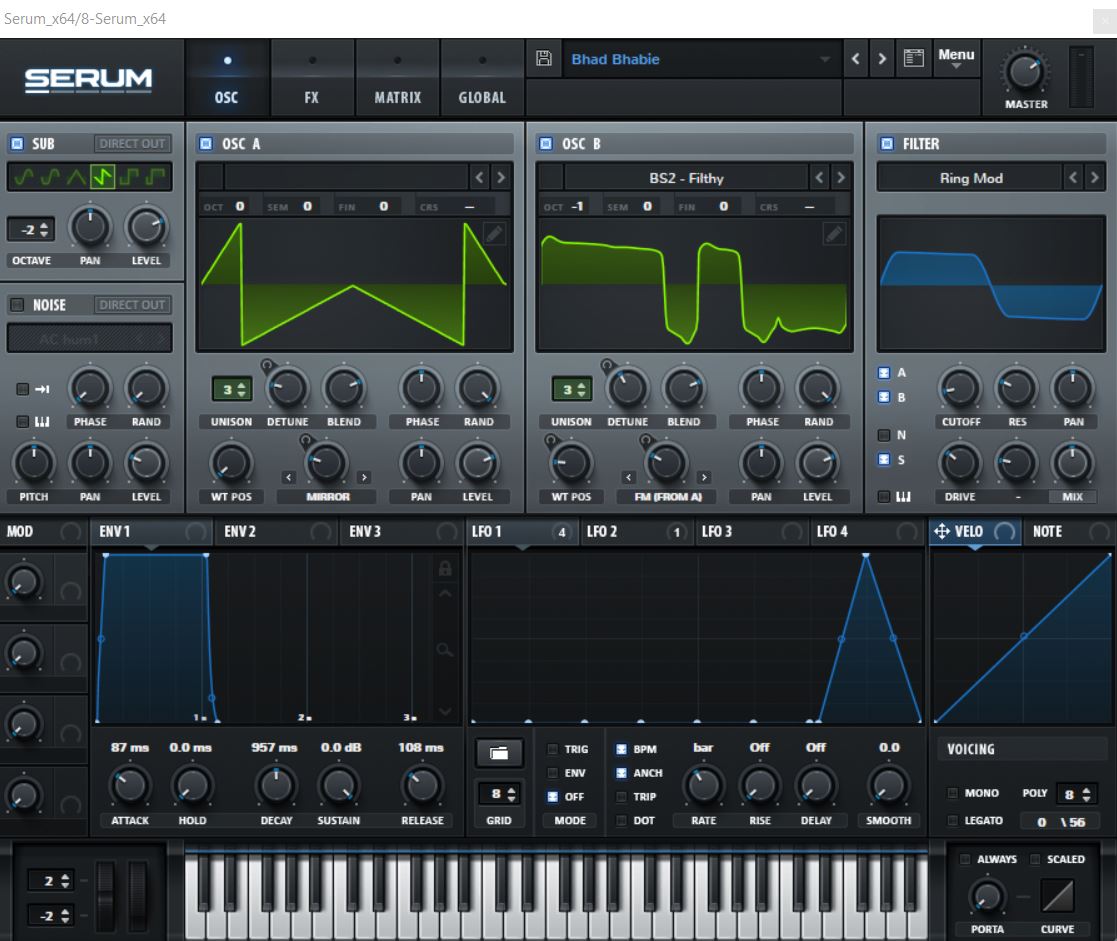
- The patch is tuned to a Maqam tuning using a tun file loaded into the global settings. The tun file was generated from Scala. I started getting board with 12 TET a while ago and Scala has been a really fun way for me to get excited about writing synth lines again.
- The piece consists of 8 tracks and the sections are evenly written into 1-bar, 2-bar, or 4-bar phrases.
- 1 drum rack
- 5 instances of Serum
- 1 instance of Cthulhu
- a track for some sample files
- a mastering chain on the Master track
Performing Birth Machine in TidalCycles
I just start by rendering samples from each section (in 1-bar, 2-bar, or 4-bar durations depending on their length) and saving them in my Dirt Samples folder each in their own sub folder within the main Dirt Samples folder.I also put a lot of consideration into the way I name my sample files. I usually include the track name or an acronym/abbreviation of it and a description of the sound.
With my brain anxiously trying to keep all the channels sorted while people are watching me, a phrase that describes the sample sound just tends to be much more useful because I will 100% forget what "BM_MainSynth" sounds like or does in the whole mix while "BMGrind" is instantly identifiable and my brain says "oh that's the thing that's making the grindy sound, okay that's the one I need to adjust right now." Or if I'm hearing something coming from a channel that needs to be turned off I can listen and think "okay there's something making a scattering sort of sound" and then I look through my channels and voila, there's "BMScatter".
Drums the "Whole-Chunk" way
If you're the kind of person who starts in the DAW and moves everything over to code afterwards, there are two approaches to performing the drum tracks.
Render the drum samples individually, save them to the Dirt Samples folder and write patterns using those samples, like:
d1 $ s "Kick [Kick, Snare] Kick [Kick, Snare]"
That can work but there can be drawbacks:
- Velocity information from MIDI drum racks might be lost
- Anything very slightly off the beat grid will be lost
- Drum sections made with sequencers can be a painstaking process to recreate, depending on the specific sequencer and pattern used
- Whole-chunk: render the drum track as one full sample, then transform it
This is what I did for Birth Machine. So even though the opening drum section is just a quarter kick on the first beat and nothing else - I can usesplice,fast, andrandslicecommands to transform that into something else and seamlessly transform it back into a simple quarter kick on the first beat just by changing or erasing the opening segment of that one line of code. Or just copy and paste the change into a new line so you can easily go back to something you thought was pretty neat without the hassle of remembering it and rewriting it.
d1 $ s "BMDrums:1" # gain 1.1
d1 $ splice 8 " 1 3 4 2 8 7 7 6" $ s "BMDrums:1" # gain 1.1
You can also do really neat stuff with rhythms when you approach them the "whole-chunk" way. This section:
d1 $ s "BMDrums:2" # gain 1.1
was 2 bars of drum patterns which could have been coded as:
d1 $ s "[Kick, OpenHat:1] [Kick, Snare, OpenHat:2] [Kick, OpenHat:1] [Kick, Snare, OpenHat:2]"
or
d1 $ s "[[Kick, OpenHat:1] [Kick, Snare, OpenHat:2]]*2"
followed by
d2 $ s "[closed:1, closed:2, closed:1, closed:2]*4"
but, in my opinion, it's fun and easier to just write:
d1 $ s "BMDrums:1"
and then to radically transform by simply adding:
d1 $ splice 8 " 1 3 4 2 8 7 7 6" $ s "BMDrums:1" # gain 1.1
I also like to use additional FX onto my drum sections in Ableton. If you slap a reverb from Tidal onto your drum channel then you'll get what you'd expect, a drum section with some reverb. But if you render a sample of a drum section that already has a reverb baked into it or maybe some reverb and additional FX and then do something like:
d1 $ splice 8 " 1 3 4 2 8 7 7 6" $ s "BMDrums:1" # gain 1.1
Then you're suddenly going to get not only the drum samples themselves chopped and rearranged around but also the pre-rendered reverb, delay, or distortion you baked into the sample and sometimes it can sound really cool, depending on the pattern of the chop you programmed into Tidal.
For me the whole-chunk approach leads to some really next-level drum patterns that I've found tend to get an extremely positive response from audiences. People in general are accustomed to a kick drum hitting very regular beats. A kick drum that flies all over the place in a pattern so wild it almost feels random is something very raw that alerts people's senses and it's something I use in a lot of my tracks to build up to different sections.
With the live performance of Birth Machine you start with a very regular kick drum beat that quickly starts flying all over the place and once enough synth layers have built up everything releases and drops back to a very regular quarter kick beat. The effect is something similar to a drop or build up in EDM but it's uniquely a live coding sort of technique.
I like to do the same thing with synth lines. In Birth Machine you have a very predictable sort of synth line that, once the track enters its second A section, suddenly changes to feel more synced to the beat but in an erratic way. It's unexpected and when triggered at the right moment the audience responds to it very positively.
Birth Machine code
Birth Machine: full code I start with for performance
d1 $ s "BMDrums:1" # gain 1.1
d1 $ splice 8 " 1 3 4 2 8 7 7 6" $ s "BMDrums:1" # gain 1.1

d1 $ fast 16 $ randslice 8 $ s "BMDrums:1" # gain 1.1

d2 $ fast 4 $ randslice 4 $ s " BMGrind:1" # shape 0.2 # lpf 3200 # gain 1.2
d2 $ fast 16 $ randslice 8 $ s " BMGrind:2" # shape 0.2
d2 $ splice 8 " 1 3 4 2 8 7 7 6" $ s " BMGrind:2" # shape 0.2

d2 $ slice 16 "16 15 14 13 12 1 2 3 4 15 14 13 12 5 6 7 8 11 10 9" $ s "BMGrind:1" # shape 0.4
d3 $ slow 2 $ s "BMPulse" # delay 0.4 # delayfb 0.5  # delaytime 0.4 # lpf 2400

d3 $ slow 2 $ striateBy 16 (1/8) $ jux rev $ s "BMPulse" # lpf 700 # delay 0.4 # delayfb 0.5  # delaytime 0.4

d4 $ slow 2 $ s "[BMChop:2 BMChop:2 BMChop:2 BMChop:2] [~~~~]" # delay 0.8 # delayfb 0.6  # delaytime 1.4
d4 $ slow 2 $ s "[BMChop:2 ~ ~ ~] [~~~~]" # delay 0.8 # delayfb 0.6  # delaytime 1.4
d4 $ slow 2 $ jux rev $ s "[BMChop:2 ~ ~ ~] [~~~~]" # delay 0.8 # delayfb 0.6  # delaytime 1.4

d4 $ slow 2 $ s "[[BMChop:2 BMChop:2] ~ [BMChop:2 BMChop:2] ~] [~~~~]" # delay 0.8 # delayfb 0.6  # delaytime 1.4

d5 $ striateBy 16 (1/8) $ s "BMScatter:2"
d5 $ splice 8 " 6 6 6 5 5 5 3 2" $ striateBy 16 (1/8) $ jux rev $ s "BMScatter:2"
d5 $ chew 8 "7 6 5 1 " $ striateBy 8 (1/8) $ jux rev $ s "BMScatter:2"

d5 silence

d1 $ s "BMChop:1" # gain 1.1

d3 $ slow 2 $ splice 8 " 6 8 7 5 3 3 2 1" $ s "BMPulse" # delay 0.4 # delayfb 0.5  # delaytime 0.4
do
    d1 $ s "BMDrums:2" # gain 1.1
    d2 $ s "BMGrind:1"
    d3 silence
    d4 silence
    d5 silence
    d6 silence

d2 $ striateBy 4 (1/4) $ s "BMGrind:2" # shape 0.6

d1 $ s "BMChop:1" # gain 1.1

d1 $ splice 8 "1 4 1 3 2 6 1 7" $ s "BMDrums:1" # gain 1.1
d2 $ splice 8 "[2*8 4 16 2 7 32 16 8]" $ jux rev $  s "BMGrind:2" # shape 0.3
d3 $ slow 2 $ slice 8 "8 8 8 ~ ~ 2 2 1" $ s "BMPulse" # delay 0.4 # delayfb 0.5  # delaytime 0.4

d3 $ slow 2 $ slice 8 "8 8 8 ~ ~ 2 2 1" $ jux rev $ s "BMPulse" # delay 0.4 # delayfb 0.5  # delaytime 0.4

d4 $ slow 2 $ s "[BMChop:2 BMChop:2 BMChop:2 BMChop:2] [~~~~]" # delay 0.8 # delayfb 0.6  # delaytime 1.4
d5 $ striateBy 16 (1/8) $ s "BMScatter:4"
d5 $ splice 16 " 3 2 16 15 14 12 11 8 7 6 5 3 1" $ striateBy 16 (1/8) $ jux rev $  s "BMScatter:4"

d6 $ s "BMGrind:1" # gain 1.1
d4 $ fast 8 $ randslice 8 $ jux rev $ s "BMChop:2" # delay 0.8 # delayfb 0.6  # delaytime 1.4
do
    d1 $ s "BMDrums:2*8" # gain 1.1
    d2 $ s "BMGrind:3*4"
    d3 silence
    d4 silence
    d5 silence
    d6 silence

d2 silence
d3 silence
d4 silence
d5 silence
I also like to keep an entire set in one file with comment breaks for each piece. I also keep all channels silence commands saved somewhere either at the beginning or very end of the whole document so I can always jump to the command I need if things go too far off the rails. Depending on the pieces I have planned to perform or how much improvising I plan to do I try to keep at least 10 channels ready to silence but sometimes as many as 20.
Code saving strategy
With Birth Machine I have some changes to the studio/vanilla version prepared ahead of time. I don't have the original code saved either, so whatever I forget to change back at the end of a performance remains in the code, so it sort of permanently changes and mutates with every performance. On other pieces I keep both a 1) slightly modded version and 2) a very vanilla version that is completely faithful to the studio version so that I can do entirely new and different things to it live spontaneously.
Sapphica
I did something similar with a piece commissioned by the Minnesote Opera, titled Sapphica.
| YouTube Performance | Remixed version on Bandcamp |
|---|---|
| Sapphica: Minnesota Opera | Sapphica Redux |
Sapphica code: vanilla version of Act 2
setcps (120/60/4)

d1 $ slow 5 $ s "Sapph2intro"
do
  d1 $ sound "wolfkick [BehemothSnare, BehemothKick] wolfkick [BehemothSnare, BehemothKick, BehemothClap]"
  d2 $ sound "[BehemothOpen BehemothClosed BehemothOpen BehemothClosed]*4"
  d3 $ sound "[~] [BehemothMini BehemothMini ~ ~] [~] [BehemothMini BehemothMini ~ ~]"
  d4 $ slow 3 $ sound "Sapph2Bass1:1" # gain 1.1

do
  d4 $ slow 2 $ s "Sapph2Bass1:2" # gain 1.1
  d5 $ slow 3 $ s "Sapph2rythym:1"
  d6 $ slow 3 $ s "Sapph2rythym:2"

do
  d4 $ slow 3 $ s "Sapph2inter:1"
  d5 $ slow 3 $ s "Sapph2inter:2"
  d6 $ slow 3 $ s "Sapph2vocalchop:1"
  d7 $ slow 3 $ s "Sapph2vocalchop:2"

d7 silence

do
  d1 silence
  d2 silence
  d3 silence
  d4 $ slow 4 $ s "Sapph2trans"
  d5 $ slow 4 $ s "Sapph2out:3"
  d6 silence
  d7 silence
  d8 silence
  d9 silence

d4 silence

do
  d1 $ sound "wolfkick [BehemothSnare, BehemothKick] wolfkick [BehemothSnare, BehemothKick, BehemothClap]"
  d2 $ sound "[BehemothOpen BehemothClosed BehemothOpen BehemothClosed]*4"
  d3 $ sound "[~] [BehemothMini BehemothMini ~ ~] [~] [BehemothMini BehemothMini ~ ~]"
  d4 silence
  d5 silence
  d6 $ slow 4 $ s "Sapph2out:1"
  d7 $ slow 4 $ s "Sapph2out:2"

d1 silence
d2 silence
d3 silence
d4 silence
d5 silence
d6 silence
d7 silence
d8 silence
hush
Sapphica code: slightly modded version
setcps (120/60/4)

d1 $ slow 5 $ s "Sapph2intro"

do
  d1 $ sound "wolfkick [BehemothSnare, BehemothKick] wolfkick [BehemothSnare, BehemothKick, BehemothClap]"
  d2 $ sound "[BehemothOpen BehemothClosed BehemothOpen BehemothClosed]*4"
  d3 $ sound "[~] [BehemothMini BehemothMini ~ ~] [~] [BehemothMini BehemothMini ~ ~]"
  d4 $ slow 3 $ sound "Sapph2Bass1:1" # gain 1.1

d4 $ slow 3 $ striateBy 16 (1/4) $ rev $ s "Sapph2Bass1:1" # gain 1.1

do
  d4 $ slow 2 $ s "Sapph2Bass1:2" # gain 1.1
  d5 $ slow 3 $ s "Sapph2rythym:1"
  d6 $ slow 3 $ s "Sapph2rythym:2"

do
  d4 $ slow 3 $ s "Sapph2inter:1"
  d5 $ slow 3 $ s "Sapph2inter:2"
  d6 $ slow 3 $ s "Sapph2vocalchop:1"
  d7 $ slow 3 $ s "Sapph2vocalchop:2"

do
   d6 $ slow 3 $ rev $ striateBy 12 (1/4) $ s "Sapph2vocalchop:1"
   d7 $ slow 3 $ striateBy 12 (1/2) $ s "Sapph2vocalchop:2"

d7 $ slow 3 $ rev $ slice 12 "12 11 10 9 4 5 6 7 1 2 3 8" $ s "Sapph2vocalchop:2"
d7 silence

do
  d1 silence
  d2 silence
  d3 silence
  d4 $ slow 4 $ s "Sapph2trans"
  d5 $ slow 4 $ s "Sapph2out:3"
  d6 silence
  d7 silence
  d8 silence
  d9 silence

do
   d4 silence
   d5 $ slow 4 $ striateBy 16 (1/4) $ s "Sapph2out:3"

do
  d1 $ sound "wolfkick [BehemothSnare, BehemothKick] wolfkick [BehemothSnare, BehemothKick, BehemothClap]"
  d2 $ sound "[BehemothOpen BehemothClosed BehemothOpen BehemothClosed]*4"
  d3 $ sound "[~] [BehemothMini BehemothMini ~ ~] [~] [BehemothMini BehemothMini ~ ~]"
  d4 silence
  d5 silence
  d6 $ slow 4 $ s "Sapph2out:1"
  d7 $ slow 4 $ striateBy 16 (1/4) $ s "Sapph2out:2"

hush
With the code that already has some variations:
- I have changes that I know I like and can adjust the values.
- I can also easily transition from things that work to things that I haven't tried before.
With the completely vanilla versions:
- I have a structure that aligns with the studio version.
- I can change and reinterpret in a much more improvised manner.
I usually choose one version of the code to commit to and then keep that in my file for that set.
SuperCollider template
I also keep a template for all my SuperCollider code. It contains all the code I would want ready on-the-fly to save time during a performance. I comment all the lines so that I know what does what. I find it helpful to have these things ready in one file. I'd rather have the code do what I expect while performing rather than have it send back an error because I made a typo and didn't capitalize something. If an error is going to happen I want it to be because I pushed the limit of the hardware or software, but that's just me.
SuperCollider setup and customizations
//To check what audio devices you have available.
ServerOptions.devices

//To boot the server on your ASIO device. You'll want to replace the Focusrite with your own device as it's referred to in the string array shown after running the code on line 10.
s.options.inDevice_("Focusrite USB ASIO").outDevice_("Focusrite U SB ASIO"); s.boot;

//Set the sample rate
s.options.sampleRate = 44100;

//Create 20 channels for 10 stereo channels
s.options.numOutputBusChannels = 20;

//Start superdirt and specify the numer of orbits or stereo channels
~dirt.start(57120, \[0, 2, 4, 6, 8, 10, 12, 14, 16, 18\]);

//Blocksize, change depending on your hardware and latency
s.options.blockSize = 128;
s.options.hardwareBufferSize = 128;

//Start superdirt
SuperDirt.start;

// In case you need to increase the memory allocated to supercollider
s.options.memSize = 3145728;
s.options.memSize = 8192*32;

//Kills the server and cuts all audio from supercollider
Server.killAll

//If you get latency issues you can set it here
s.latency = 0.05;

//To record your session
s.record;
s.stopRecording

//Set the orbits up for Tidal

~dirt.orbits[1].set(\fadeTime, 4);
~dirt.orbits[2].set(\fadeTime, 4);
~dirt.orbits[3].set(\fadeTime, 4);
~dirt.orbits[4].set(\fadeTime, 4);
~dirt.orbits[5].set(\fadeTime, 4);
~dirt.orbits[6].set(\fadeTime, 4);
~dirt.orbits[7].set(\fadeTime, 4);
~dirt.orbits[8].set(\fadeTime, 4);
~dirt.orbits[9].set(\fadeTime, 4);
~dirt.orbits[10].set(\fadeTime, 4);

//code for Sidechain compressor taken from https://github.com/musikinformatik/SuperDirt/blob/develop/hacks/filtering-dirt-output.scd
~bus = Bus.audio(s, numChannels:2); // assuming stereo, expand if needed

~dirt.orbits[0].outBus = ~bus; // play into that bus.

// make a side chain controlled by second orbit, affecting the first
(
Ndef(\x, {
    var control = InBus.ar(~dirt.orbits[1].dryBus, 2).sum;
    var dirt = InBus.ar(~bus, 2);
    Compander.ar(dirt, control, thresh:0.006, slopeBelow:1, slopeAbove: 0.1, clampTime:0.05, relaxTime:0.1)
    //dirt * (1 - (Amplitude.kr(control) > 0.007).poll.lag(0.01));
}).play;
)

/*
cleaning up when you're done (run the code below to release the sidechain):
*/
(
Ndef(\x).clear;
~busses.do { |x| x.free };
~dirt.orbits.do { |x| x.outBus = 0 };
);

// algorave mastering, roughly according to
// https://mccormick.cx/news/entries/heuristic-for-algorave-mastering
(
~busses = ~dirt.orbits.collect { |each|
    var bus = Bus.audio(~dirt.server, ~dirt.numChannels);
    each.outBus = bus;
    bus
}
);

(
Ndef(\x, {
    var level = 1;
    var distortion = 3;
    var reverbFeedback = 0.1;
    var all = ~busses.collect { |each| InBus.ar(each, each.numChannels) };
    var mix = all.sum { |x|
        var d = { 0.01.rand } ! x.size;
        DelayN.ar(x, d, d)
    };
    var loop = LocalIn.ar(~dirt.numChannels);
    5.do { loop = AllpassL.ar(loop, 0.15, { ExpRand(0.03, 0.15) } ! 2, 3) };
    mix = loop * reverbFeedback + mix;
    mix = LeakDC.ar(mix);
    LocalOut.ar(mix);
    mix = Compander.ar(mix, mix, 0.3, slopeBelow:1, slopeAbove:0.5, clampTime:0.01, relaxTime:0.01);
    mix = (mix * distortion).tanh * (level / distortion.max(1));
    mix
}).play;
);

/*
cleaning up when you're done:
*/
(
Ndef(\x).clear;
~busses.do { |x| x.free };
~dirt.orbits.do { |x| x.outBus = 0 };
);
Closing
I don't think my approach is right for everyone. In fact, it might only be right for me and only me. The intent of this article was just to share my coding practice and open the discussion up further. If anyone found anything useful or inspiring in any capacity I think that would be wonderful.
This article also came about after some forum thread posts I made in response to Heavy Lifting's blog post: Working with samples the Heavy Lifting way. The discussion thread from her article is really interesting and I was inspired to respond with my own approach.
I think each coder's approach is going to be unique in some capacity and they're all valid. People change too and that's especially true with musicians, producers, and composers. The approach I take now might not be the one I take seven years from now or even between one performance to the next and I think there's room to move between approaches fluidly if it sparks your creativity and brings you joy. I would hope that we are all doing this to have fun, and ultimately we should do what is fun for us.
Comments: Share your thoughts and keep the discussion going via this Club Tidal forum thread.